From one perspective, dredging the ocean floor for rocks is a rudimentary undertaking – blindly dragging a rugged basket on the ocean floor to try to scoop up rocks. But in fact, dredging involves a complex choreography of equipment and people – and if not executed correctly, it could rapidly become dangerous.
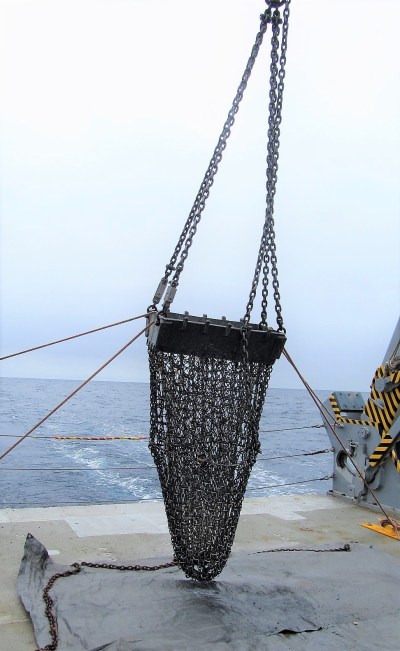
The dredge itself weighs about 500 pounds and consists of a chain-link “basket” attached to a “crown” of welded steel plates and “teeth” (Figs 1 and 2). The teeth are there to break off rock exposed on the bottom of the ocean, which hopefully then collects in the chain basket. Within the chain basket, there is a net lining, to which we tie a new burlap bag each dredge – to catch bits of small rock that might otherwise wash out through the openings in the net and chain basket (Figs 3 and 4). Just before deploying the dredge, we throw in a heavy iron weight tied within a burlap bag, to prevent the chain basket from inverting and coming out through the crown.


Now, before describing an absolutely critical component – the ‘weak links’ – we need to explain that it is not uncommon to ‘lose’ a dredge: in other words, leave a dredge on the ocean floor because it got stuck and can’t be recovered (probably because it got caught under an overhanging rock ledge).
It is not a problem to lose a dredge! Dredges are relatively cheap to make (we brought four dredges with us, in the expectation that we might lose one or two). The really expensive part of the system is the trawl wire: this 10,000 meter-long (40,000 ft), 1.6 cm- (5/8 inch-) thick wire costs up to $50,000! So, if the dredge gets stuck, we’d rather leave it than break the trawl wire, trying to get it unstuck.
This is where the weak links come in. On the chains that attach the dredge to the trawl wire, there are three weak links, which are designed to break when the tension on the wire exceeds a certain value – and they are set to break at a lower tension than the tension that would break or shear the wire. So, when the dredge gets caught on something and we can’t tug it off, we may purposely pull to reach a tension sufficient to break a weak link – thereby preserving the wire (and leaving the dredge to its watery grave).
You might think that the weak link is some fancy piece of equipment to serve such an important function, but in fact it is very simple. It is a thick metal screw that holds two blocks of metal together (Fig 5). It is rated to shear (bend or break) at a specific tension. We have three weak links on each dredge, and each is rated to break at a different tension. As it happens, on a particularly big “bite” during this cruise (when the dredge got hung up on a rock), one of the three weak links sheared, but it didn’t break (Figs 7 and 8).


Now that we’ve covered the basic equipment, check back later to learn what each of the dozen or so people do to successfully launch and recover a dredge.
–Emily M. Klein, Chief Scientist